I will show you a step-by-step process, of how to tie die a tee shirt at home the easy way. We are going to do this a little bit differently than the traditional tie-dye method. So if your ready and up for a little artistic challenge, follow along with me!
_shirt
_spray bottles
_paint or fabric paint
_ rubber bands?
Step 1. Get a shirt, ti tie-dye.
Step 2. You will need some paints of your color choice. I recommend fabric paints for optimal distribution and wear.
Step 3. You will need some spray bottles, to put the paint in. Fill the bottle 1/5 full of paint. One color in each bottle
Step 4. Fill the rest of the bottle with water.
Step 5. put the caps on and shake,shake,shake. make sure the paint is all mixed in.
Step 6. hang your shirt somewhere outside, (trust me if you don't want a mess you can't skip this step).
Step 7. twist the shirt and tie it with a rubber band, this will give you a spiral effect. (this is an optional step)
step 8. Spray the shirt front till you are satisfied with it.
Step 9. repeat steps eight and nine on back.
Step 10. Hang it somewhere and let it dry for 48 hours (indoors or out) before washing.
Tip: The closer the spray bottle is the more concentrated it will be, the farther back it is it finer mist.
Do you have dogs or any pets that go outside? We love our pets, We want the best for them. But we hate fleas right? Though's nasty, itchy, creepy little bugs are so annoying!
We hate to put the harsh Flea medicines on our dogs. Sometime it must be done. But it is better to avoid it when you can.
So what can you do? When we had fleas I was looking for a natural method. Here are three home remedies for fleas on dogs.
1. Use a "Flea Comb" it is quite easy. Get a dish of soap and water, to put them in as you find then. And then just comb your dog and the fleas will get scooped up by the comb.
2. Here is a natural flea bath. I used "Dawn" to wash our dogs. It must be "Dawn dish soap".
Put 2-3 teaspoons of "Dawn" in 4 cups of water. Get the dog wet. And then a little at a time dump the mixture of "Dawn and water" on the dog, and lather. Let it sit for 5-10 minutes ( yay right!). I would not do a bath more than once a week. If you do your dog's skin might get overly dry.
3. take 1/4 a cup "Apple Cider Vinegar" or "Destilled White Vinegar" and mix it with 1 cup water.
Wipe on your dog every other day and let air dry. It will repel the fleas. I recommend setting with your dog till it drys so they don't lick it.
These are only for minor flea problems. If you have an on going flea problem, I suggest you contact your Vet.
Hello fellow readers, I have a recipe that I made for you today. but before I tell you how to make it I want to tell you a little history of it. We have a dog named Ruben. we got him when he was five, He had bad teeth. one day we got all his teeth pulled out. now he's much happier, but he can not eat most of the tree, out in the stores. so I made up this recipe that he can eat much easier, and he loves them too. our other dog who has no problem eating the other treats, also will eat these treats. and they're also good for them because they have carrots.
Today I will be sharing a recipe with you. of how to make healthy carrot dog treats. I know your dogs will love them, ours certainly did. And these streets are very quick and easy to make, only about 20 minutes for the whole process. This recipe makes about 30 treats.
The first step is to mix all the ingredients together. you should come out with a doughy consistency. You will have to get your hands a little dirty for this step, a spoon is hard to use to mix so I just use my fingers. Now once it's all mixed you'll take it out brake about a quarter sized pieces off or maybe a penny, if you want smaller teats. Get a cookie sheet out. and now take the piece you break off and squash it down flat, and put it on the sheet. Now just repeat with all of them and tell you how all the dough used. That's how you make my healthy carrot dog treats. Cook in the oven, 350 degrees. for 5 to 10 minutes.
You'll know they're done when the outside is still if you squeeze it, but it has a little of a crisp top layer on it. It is best if you keep these in the refrigerator, because if you don't they will move very fast. They do not have any preservatives in them to keep them fresh, so they will do that.
These are so healthy you could eat them yourself (they don't taste very good, I tried)😄😝
Simple and easy!
So let's get down dirty. Get out Our aprons.
Now here is the recipe for you.
1 half a cup of grated carrots
1 1/8 cups of flour
3/4 a cup of peanut butter
1 oz of water
Today I am going to show you how to stamp your nails. It is quite easy, once you learn how.
you must first paint your nails with a base color, a darker color works best. You can do your fingers, and your toes if you would like. then you pick a design you want. Dab some fingernail polish on and pick it up with your stamping tool.
It's the design you picked, is a smaller one and it fits on your nail. You can simply stamp it on your nail. But I find a lot of the designs don't fit on my nail, So when that happens don't worry. Start with your nail at the end of the design, and simply roll it's on.
I also have a video, to walk you through the steps. If you prefer to watch instead of reading better.
Do you have a tablet, and need something to protect it? But you don't want to spend an arm and a leg for it? Well, I have a way you can make a nice but cheap case.
You will Need
Fabric
CardBoard
Hot Glue
Optional Supplies
Sewing Machine
Cardboard
Hair Tie
Button
Solution W x 3 + ½ inch L X 2 + ½ inch
Step One: Cut the fabric for your tablet.
Step Two: Fold in half widthwise and turn the wrong side out. Put a hair tie (half way)in at one of the tops (if desired(you may halve to tape it in place.)
Step three: Sew ¾ the way around. You can use hot glue if you don't have a Sewing Machine.
Step Four: Turn it right side out.
Step Five: Cut three sheets of cardboard, glue them inside the pocket.
Step Six: Sew the opening shut. Sew in-between each piece of cardboard.
Step Seven: Fold one third and sew on each side, so you will now have a pocket
Step Eight: If you put a hair tie in step two, then you will need a button to secure it. Hand sew a button on where the hair tie will reach, it may help to make a small pen mark in the center of the hair tie.
TIP:
The pocket may be a little tight for your tablet at first, if needed push both your hands in and stretch it a little.
Now you have made a tablet case. I hope you like it and it works well for you!
Do you like gardening? Do you like DIY projects? Are you thrifty/cheap? Well, I have a DIY project that will meet all throughs criterias. I love gardening, flowers, and vegetables!
I love getting my hands dirty, it shows hard work!We sometimes get plant starts from the store, but we usually start then by seed. Do you start then by seed or plants?
Anyway, I have a way you can make seedling pots to start your plants in. All you need is newspaper! We get the newspaper at our house but of course, you can get it at almost any store too.
These pots are also Eco-friendly. They will decay naturally when you are done with them and through then away. That means if you wanted you could also pot them straight in the ground and they will naturally compost.
Watch the video to see how to make these simple and
Eco-friendly pots.
Make a streamer:
It's as simple a making a long change, of colored paper. Hang in above the door or something.
Now you have a streamer for almost nothing. Another way is if you have a roll of paper, write Happy Birthday in big letters and tape it up. A third way is to cut a long strip of paper or tissue paper and give it a gentle twist as you put it up.
Balloons:
we use to make people balloons all the time at my party when I was a little girl. To make them blow up a small balloon, cut out feet in paper cut a whole for the tie of the balloon to go through and stand it up. Or if you want helium balloons you can usually get them for a dollar or two at most stores.
That's my tips of what we've done at our parties. I hope they have helped you.
And here are a couple videos of how to paper decorations.
Here is how to make a Witch Rope. Why is it called a Witch Rope? It really has nothing to do with Witches. The name came because, my brother asked what it was and my mom jokingly said maybe it's to catch witches, it looks like a bunch of brooms hanging.
Anyway whatever you want to call it, I think it's pretty. So I am going to teach you how to make one today. let's get started.
Step:1 Pick a bunch of yarn colors you like. I had a bunch of scraps that was perfect for this project.
Step:2 Get a box to wrap the yarn around, or even your hand depending on how long you want the tassels too be.
Step:3 Wrap the yarn around at least 20 times.
Step:4 cut it at the bottom but make sure to hold the top while you can or they will all fly back from the tension, and you'll have a big mess.
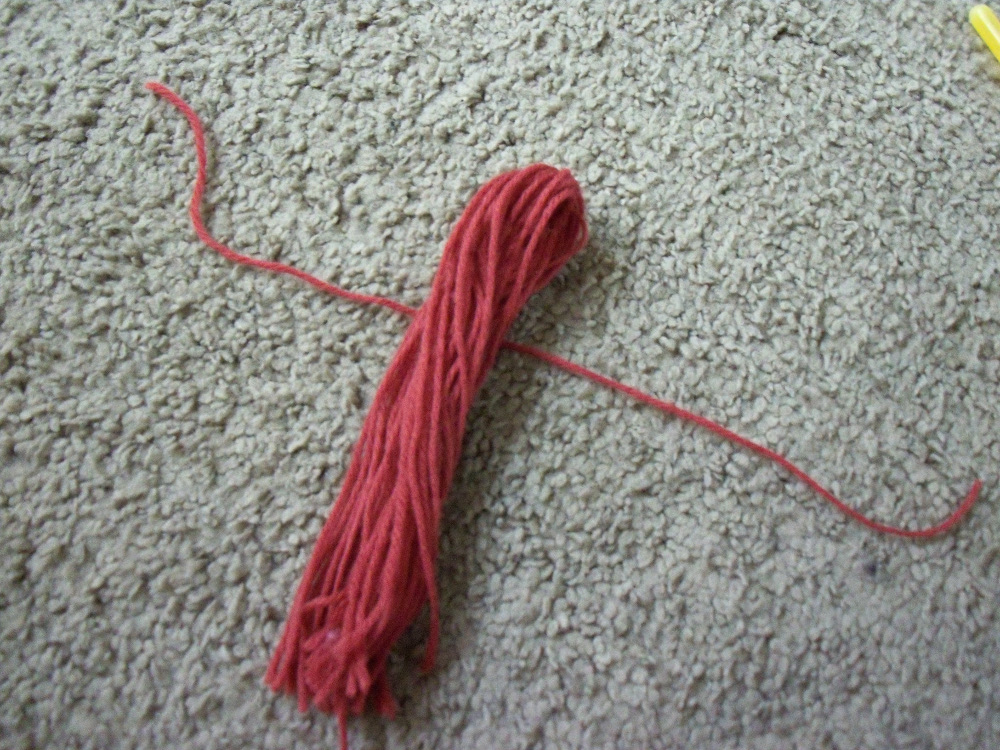
Step:5 Now grab the top center. Lie them on the table. Cut a new string and tie it about 1/2 an inch from the top.
Step:6 Cut a color of string to hang the tassels from.
Step:7 Thread the tassel on the string.
Step:8 repeat steps: 1, 2, 3, 4, 5, and 7 as many times as desired
Today I am going to review a product. this is a kit I got called hair chalk. I got it off of Amazon. Amazon is a very widely known Internet store. I had a gift card for there. My grandma always gives me gift cards for birthdays and Christmases, she does not like to shop for anything.
this product is nice if you like to color your hair but do not like the permanent effect of the coloring you might find at a salon. or the idea of chemicals being put on your head and having it stink as they put it on comma I've never had hair coloring done but I've had people tell me it just stinks awfully bad.
I do like the idea of a little streak of coloring in your hair though. I it looks quite pretty. But I do not want it to be there all the time because some my mood changes or I want a different color. So if you're like me this is a great product for you. it goes on very nicely it is a little messy if you get it on your hands or anything like that and do not get it on your clothes because it will not wash out, even though it washes out of your hair I found that out the hard way.
So anyway let's get started with the thoughts on this product. I rambled on enough already, haven't I?
so this kit (Hair Chalk) Is a great product in my perspective. It is great for a middle-aged girl teenager to even a young adult. It comes with 5 colors I believe. and it also comes with some beads hair and a beading tool which is plastic and I will warn you it will break easy after use for a while or if pulled on hard. You can make a new one out of a paperclip or any wire even string, anything lying around. It comes with instructions to do both of the the hair chalk and the hair beading oh and it comes with (what's those things called duh I can't remember) rubber bands (okay hello what was I saying Again I remember okay) it comes with rubber bands that you can wrap around the piece of hair under the beads to keep them on but I have pretty think hair and I actually found you don't really need the rubber bands.You can use the rubber bands if you want to not, just try them see what works best for you. This kit came with pink purple blue orange and one other color of hair chalk. I like the pink and purple the best you can pick your favorite.
And when you put it in you can put it in one day and take when you take a shower at night it washes right out. So if your mood changes you just want to do it again for fun you want a different color sing like that. you can change it that's what I like about this product it isn't permanent. I do not like anything permanent. I a person who likes to change things even in my room I'm constantly trying to think of new stuff to make and to try.
I have a video here, of me using the product. you can watch the video if you would like to see how it works.
Today I'm going to tell you how to make A bug house. If you find a bug in the yard that you want to keep or observe you will need a house for it. This is a very simple bug house that you can make out of everyday household objects. So let's get started.
First you will want to find a small container with a lid. The next step is to cut a hole in the top of the lid. Now you want to find some fabric that the bug cannot get through but it still haves holes so the bug can breathe. These holes can be microscopic as long as long as air to go through them.
Now you will want to tape the fabric over the hole. I used duct tape, because it is quite sticky and strong.
Now you will want to use hot glue on the inside where there is a small space between the fabric and the edge of the hole you cut. You will want to do this so the bug does not get out but also so if the bug crawls up there he does not cut himself. Put the glue all the way around making sure to cover any openings and any sharp spots.
Now you have made a bug house for yourself. You can go out and explore in your yard and try to find a bug to observe.
Now it's getting towards winter. And getting cold outside, if you have dogs they are certainly bound to get cold just like you. Would you like to make them a sweater. or even a Christmas gift? This is a easy and simple arm sleeve sweater.
Do you have old sweaters laying around? If not you can easily get some Goodwill or your local thrift Market. we have small dogs a dachshund chiweenie a wiener dog dachshund mix. the sweaters are made for small dogs. If you have a large dog this pattern may not work for you.
Take a sweater and cut one of the arms off. Now figure out where the dog legs,will go two holes in the appropriate spot for them. I only made two holes for the front feet only sweater I made.But if yours is long enough that you need for front and back feet holes you can cut those. you can sell around the hole if you want to but it is not necessary.